SETH'S
REED
MAKING
WORKSHOP
|
Please note
that I've written some additions and revisions
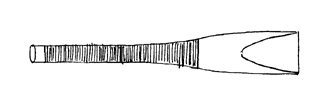
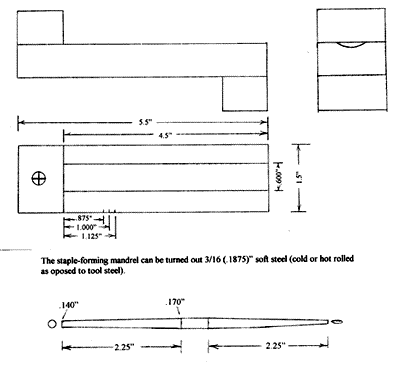
to this Guide. LIST OF TOOLS AND MATERIALS BENCH VISE MAKING THE STAPLE I use a rolled staple for both the concert pitch D and the flat pitch B and C chanters. I find that standard tubing staples produce a reed that has the octaves out of tune with each other. 3/16" outside diameter brass tubing does get fairly close to the tuning that is desired for the D chanter, and can be used when starting to make reeds. 5/32 OD tubing will ork fairly well for the B & C chanters. To make a rolled staple start by cutting a trapezoid slightly larger than the desired size out of .020" copper sheet. For D Chanter: For C Chanter:
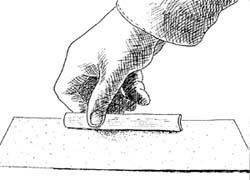
Place the staple blank in a bench vise and file one edge. You can check the evenness of the edge by placing it against a metal straightedge or the back of your calipers, and holding it up to the light. When that side is sufficiently straight file the other side to the desired width, and check it for straightness. Begin rolling the blank by placing it on the top of the vise jaws which are open about 1/4" or so. Place the tapered rolling mandrel (a steel rod turned or filed to the inside shape of the staple) on top of the copper blank and gently tap the mandrel with a hammer to bend the copper in the middle.
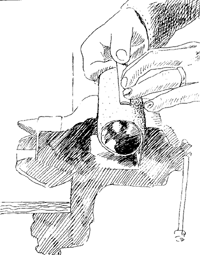
Then place the bent staple blank and mandrel on a hard surface and hammer the copper around the mandrel. Try to get the staple as round as possible when viewed from the ends. For the D chanter, the rolled staple should now have an inside diameter of .175" at the bottom end and about .150" at the top. When the staple is round it is time to shape the eye at the narrower end. If you are making a tubing staple start here after cutting it to length (a plumbing tubing cutter works well). For this operation you will need a second mandrel, one that has been filed into the eye shape. You can combine these two functions in one tool, by tapering both ends of a steel rod and filing one end into the eye shape (see dimensional drawing at end of guide).
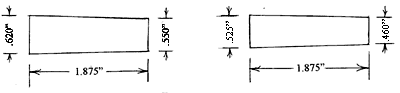
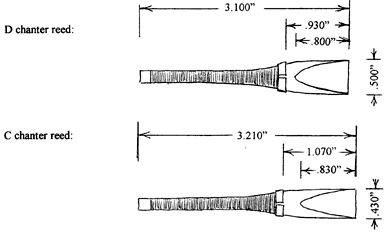
Place the mandrel up into the staple and gently hammer the top into the desired eye shape. Taper this squashed area back to about halfway from the top end. The narrow inside diameter of the inside of the eye for the D staple should be .065", and .050" for the C. File the outside of the eye to clarify the eye shape and along the seam to make it smooth. Deburr the openings carefully with a utility knife. THE CANE SLIP A cane tube diameter of about 1" to 1.050" works best for the D chanter reed and 7/8"(.875) does well for the C and B pitched reed. Final slip dimensions are as follows: Concert D pitch: 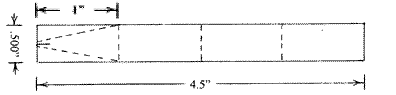
[dimension at end is .500", entire length for D, C and B is 4.5"] C and B pitch:
To form the slip, first cut a tube of cane to length. I place the cane against the back of the shooting block and slowly cut it with a fine toothed dovetail saw. Then slice a piece from the tube about .040" wider than the final width. Place it on the shooting block with the bark face down and gouge the inside until the surface is flat:
Take the slip and sand one edge straight on a flat surface (240 grit works well). Check for straightness against a straightedge held up to the light. When you find a bump hold the slip above it and sand gently. Slight pressure should cause the bump to sand down. When one side is flat, sand the other until the target width is reached for the length of the slip. The slip can now be final-gouged, getting it as close to the
finished shape as we dare. Gouging saves time versus sanding on
the sanding cylinder, but gouging too deep makes it impossible
to clean up and smooth the inside surface. As a rough guide, gouge
the edges to twice the ultimate thickness, and put a slight curve
into the center: Finishing the slip requires a round sanding block. I find that a 2.25-2.50" OD PVC pipe section works well for the D reed and a 1.8" diameter works nicely for the C. Depending on the hardness of the cane and other variables, different sized sanding cylinders may work better. It is important to keep the desired end result in mind and use whatever means best achieves this. The goal is that when the outside of the reed is sanded and scraped, the lips will be open just slightly more than the optimal width. The bridle can then be used to bring the reed lips together the necessary amount.
To finish the inside of the cane slip, wrap some fast cutting sandpaper (150 grit) around the sanding block and place it in the vise. Holding the slip between the thumb and first two fingers of the right hand sand first one end then the other, applying pressure with the fingertips of the left hand. Sand until the inside is smooth, and the edges are uniform. The goal on the edges is not knife sharp, but a few thousands of an inch thick (the thickness of two or three sheets of paper). A thick edge will produce a dull sounding reed. Finish sand the same way with finer paper (280 grit).
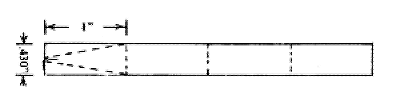
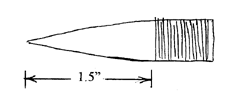
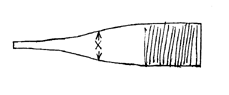
FORMING THE REED HEAD Take the smooth, straight slip and mark a center line and guide lines 1 1/8" from either end. Also mark the center of each end and draw connecting line to the edges of the 1 1/8" lines. This is a rough guide to trim the tails of the reed. With a sharp utility knife trim the tails leaving a width of about 1/8" at either end.
Now score the center line, drawing the knife from the outside edge to the center of the slip. Flip the cane around and repeat the cut on the other side. It is important to make this cut in two steps, if you try to cut from one edge to the other in one move the cane will splinter. Put the scored cane bark-side up on the sanding block and cut straight down at the center line. The score cut on the inside of the slip should help make this fairly easy. Tie these two sides together using thermo-waxed floss or hemp, making sure the edges are parallel and not overlapping. Leave about 1.5" from the tip of the tails unwrapped for sanding the edges. The reed head can be finish profiled by either sanding the edges into symmetrical curves tapering up to the wrapping: or into the trickier bottleneck design: It requires some additional paring with the utility knife to get the shape right, and some finish sanding of the edges to smooth them out and taper them towards the wrapping. As a guide, width X should be around .400" for the concert pitch reed and .335" for the C pitch reed. Chamfer the edges of the tails below the 1" point. Pipemaker Kirk Lynch suggests removing much of the bark below this point, especially with very hard cane, to reduce the chances of splitting. When the reed head is shaped mark a line 1" from the tail end, and slide it 7/8" onto the staple. Wrap some Teflon tape around the staple and cane up to the 1" line. This helps seal the edges of the cane and the seam of the staple. For wrapping the reed I use the heaviest unwaxed dental floss I can find. I wax a 6' length of it with a 50/50 mixture of bees wax and cobbler's thermo wax. The bees wax makes the sticky cobblers wax easier to work. Pre-waxed floss will also work if the Teflon tape is used with it. Tie the floss onto the bottom of the the staple about 3/16" from the end, and, holding the reed in the eye-shaped mandrel, wrap upwards. As you get to the top of the staple the edges will begin to close. Keep wrapping until they do. This should happen at about the 1" line. Then wrap back towards the bottom and tie off. The binding hemp can now be removed. SCRAPING THE REED The reed is now tied up and needs to be scraped. You can either go directly to sanding the faces on rough paper (120/150 grit) or first pair them with the utility knife into a rough V shape. Be very careful at this point, too much pressure on the thick edges can crack them. As they get thinner they flex more easily. With the gentle pressure of the first finger on the back of the cane head, sand slowly back and forth, first one side then the other, until they both develop a v-shaped sanded area. Continue sanding until the tips get fairly but uniformly thin. Then chop the reed edge back about 1/16" to clean it up with one downward press. The sanded area or "scrape" should look like this:
Test the reed for a crow sound by sucking sharply through the staple end. With the edges thin it should sound. If it doesn't then the lips are probably too far apart or too stiff, and additional scraping may be necessary.
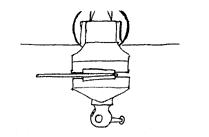
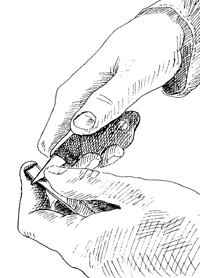
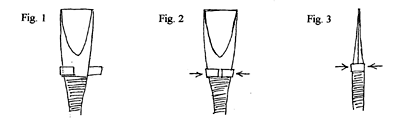
At this point, actually scraping the cane works best for accuracy in thinning the blades in the desired area. In this case that might mean lengthening the V-scrape and leaving the edges alone. With the utility knife or an Opinel knife scrape from the bottom of the V out towards the edge. Support the blades of the reed underneath with the first finger of the left hand, and guide the knife from behind with the left thumb. Scrape until the crow sounds. At this point let the reed rest for a few days (if you can) before attaching the copper bridle. The bridle is a 1/8" wide copper strip that can help either open or close the reed and is essential for the fine adjustment of the reed. To fit a bridle to a reed first form one side of the strip with needle-nosed pliers, then fold the other side by hand around the edge of the reed (fig.1). Adjust the bridle carefully with the same pliers.
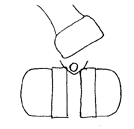
To open the lips of the reed squeeze gently at the corners of the bridle with the pliers (fig. 2). To close them gently squeeze the front and back of the reed together at the bridle (fig.3). This is the spot where the reed is most sensitive to cracking, so don't attempt to close the reed more than it wants to, and try to do it with your fingers before using the the pliers. In the event that you can't get the reed closed enough, you might want to consider using a larger diameter sanding tube next time. To get the reed working well in the chanter will take some experimentation and can sometimes only be achieved by trial and error. The following dimensions should help in deciding how far back to chop the edges and how much to scrape. Note that the length of scrape will vary from one reed to another and that dimensions of it are meant as a rough guide. The length of the D reed, from bridle to tip, may be shorter than .930", but no less than .875".
ADJUSTING THE REED AND TROUBLESHOOTING Different chanters have their own particular idiosyncrasies to keep in mind when making a reed for them. The following are some that relate especially to my chanters. Concerning the concert pitch D chanter: The note to watch, or actually listen for, is the second octave E. How this note sounds will tell nearly all on how far open lips of the reed should be. And as you will surely find out, a little difference in the aperture makes a great difference in the sound. If this note is very sharp, approaching F natural, or so unstable that a little pressure causes it to go sharp, then the lips need to be opened. The optimal aperture is the minimum that produces the slightly flat second octave E. If the lips are too open the sound will be too loud, harsh, flat pitch-wise, and hard to blow. Concerning the flat C chanter: The note to watch is the bottom D. If the reed is too short, or scraped too much, the bottom D has a tendency to gurgle. Concerning chanters in general: Quite often the bottom hard D will need to be tuned. To get it in tune with the rest of the chanter a twist tie or some such object can be inserted into the bell of the chanter. The larger the object in the bell the flatter the hard D produced and the easier it is to sound. DIRECTORY OF TOOLS AND MATERIALS I now carry some reedmaking supplies including a Basic Reedmaking Kit. Your local hardware store or lumberyard should have the following items: BENCH VISE with at least a 2" opening CALIPERS can be obtained cheaply from: Enco Manufacturing, 5000 w. Bloomingdale Ave., Chicago, IL 60639-4587. Their telephone number is (800)873-3626. They have an import 0-6" dial caliper for under $25, model 610-5026. Woodworker's Supply, 1108 North Glenn Rd., Casper, Wyoming 82601, telephone (800)645-9292, carries BENCH VISES. They have several models, including model# 891-567, a portable vise with 2 1/2" jaw opening, that sells for under $20. TUBES OF CANE, GOUGES, WAX, SANDING CYLINDERS and many other reedmaking supplies can be ordered through Nick Whitmer or David Keenan at Celtic Fire, Ltd., P.O. Box 1294, Forestdale, MA 02644-1294 Telephone is (508)833-3724. You can also get a nice gouge from Garrett Wade Company in New York, (800) 221-2942. Ask for the 3/4 inch scribing gouge. Na Piobairi Uilleann also sells gouges and reed-making supplies. If you want to order CANE from the source, Espana, Medir S. L. is the company. Tell them how many kilos you want (I would suggest at least 2 kg to make the custom duties you will have to pay worthwhile), the diameters that you want (e.g. .925 inch or the metric equivalent 23 to 24mm) and that the cane is for the Irish Uilleann pipes. Their address is: Medir S.L., Paratge Balitra s/n- Apartat 108, 17230, Palamos [Girona] Telephone 972/ 31 43 39, Fax 972/ 31 89 17 RESOURCES David Quinn's The Piper's Despair is a fine book on reedmaking for the Northumbrian and Uilleann pipes. They are $15 per copy, checks made payable to D. M. Quinn and the address is Koehler and Quinn, 70 Markham Road, East Montpelier, VT 05651 Iris na bPiobairi The Pipers' Review, published quarterly by the Irish Pipers Club, has many articles pertaining to reedmaking, and if you play the Uilleann pipes you should be a member of the Pipers club anyway. Yearly subscription and membership is U.S.: $15, Canada $19 and foreign $22. Their address is PO Box 31183, Seattle, WA 98103-1183. Telephone: (206)784-7353. NA Piobairi Uilleann also has a journal, An Piobaire, a website, and many books, tapes, and supplies for sale. Their address is 15 Henrietta Street, Dublin 1, Ireland. Phone: 353 1 873 0093, and E-mail npupipes@iol.ie. Both these Pipers Clubs have websites, they're listed on our links page. DIMENSIONS FOR SHOOTING BLOCK AND STAPLE-FORMING MANDREL For making the shooting block I use 3/4" thick oak, but
any hardwood of similar thickness should work well. Glue and screw
the pieces together, and then mark two parallel guide lines .600"
apart down the top face. Carefully gouge between the lines to
form a channel to comfortably hold the cane slip. I then add dimensional
guides of .875", 1.000", and 1.125" on the edge
of the top surface, for quickly marking the slip and the the staple. Please note: I guarantee my reeds for at least the first three
months barring any scraping, sanding, or spindling (not to mention
folding or mutilating) on your part.
________________________________________________________________ Reedmaking Guide - Revisions and Additions I originaly wrote my "Reedmaking Workshop" guide in 1997 and my basic approach has stayed as it is described in it. I have made some minor, but none the less noteworthy, adjustments to it, and continue to experiment with the various variables involved in order to produce the most consistent positive results. As in the original guide I thank Benedict Kohler for his help as trouble-shooter par-excellence. Revisions April 2001
________________________________________________________________
Revisions January 2004
Additional Information Thickness of cane slip- the thickness of the finished slip can be a usefull but not essential measurement to the reed-making process. The thickness is determined by 1. the arc of the outside of the cane (from the shape and diameter of the cane tube), 2. the width of the cane slip, and 3. the arc created by the sanding cylander. I like this measurement to be in the .040-.050" range for a D reed, but I suggest not letting this measurement determine how you finish the reed. Instead let it be one piece of information among many that helps you troubleshoot problems. An example of using it as an aid would be in a situation where a newly made reed that is shut closed. Trying to force the lips apart with a bridle causes the edges to separate, a thus reveals that there is not enough arc in the blades. This means that a smaller sanding cylander is needed. If the slip was on the thinner side before scraping, say .035-.040, a smaller sanding tube may cause a similar piece of cane to be too thin when sanded. One solution would be to use a smaller diameter of cane, and a smaller sanding cylander. Bridle Placement Options- I normally place the bridle imediately above the waxed-hemp wrapping. Sometimes other placements work better. If a reed needs to opened up, placing the bridle 5/16 or so above the wrapping is a good option to consider. Experiment and find what works best.
[ Uilleann.Com Home | Price List and Ordering Information | Flutes Information and Price List | Photos and Music Clips | Other Products: Tutors and Accessories | About the Maker | The Reed-Making Workshop | NEW Photo Page | Maintenance Guide | Uilleann Piping Contacts | Frequently Asked Questions | Uilleann Piping Links | Jerry O'Sullivan's Website | Contact Information | Tionol Information Page ] ©1997—2012 Seth Gallagher
|
||||||||||||||||||||||||||||